Message Board Facelift

Standard

There once was a fairly plain message board that was picked up for fifty cents with the vision that one day,                                            that weird green burlap and ugly pine colored frame could be something more.

One day, I finally had some free time so I introduced the plain jane message board to a flower stencil and a little white paint.

Then I painted her frame in the same white color.

Extra points if you can tell me where I got this “drop cloth”

She looks like a million bucks after her little makeover!

Here she is hanging in my new craft area, and she is now the prettiest of the bunch!


Easy Project!

Cost;

Message board- .50

Stencil- .05

Paint- Glidden tester that I got for free with coupon

TOTAL= .55

Thrifty Thursdays

Standard

I have decided to edit the name of my blog series on thriftiness from Thrifty Goodness to Thrifty Thursdays.                                               It will give me a goal to try to post my thrifted items on Thursdays and helps me have a schedule to adhere to.

Anyone who knows me personally is aware that I love to shop.                                                                                                                      Knowing that, it is easy to see why I cannot let a good Kohl’s coupon coupled with Kohls cash pass me by.

These are the details of one such shopping trip:

White skirt on sale for 8.00 that I decided looks much more awesome as a dress.

Cute top with rope halter, $3.20.

$4 embellished skirt, I am obsessed with this color!

Cute linen shorts, $14.99

Ten pairs of earrings, each under $3 per card.

Yes, you are reading that right. I saved $178 and only paid $32.

So, my total came to $45.19

I had a 15% off coupon lowering the total to $40.09

Then I used $10 Kohls cash, making my total $32.00 after taxes.

…and I saved $178.09!

What a great deal! I love Kohl’s!

Pfft, your mom goes to college.

Standard

Well, this one does.

I am two classes away from completing my associates’ degrees in Culinary Arts and Hospitality Management. Being a person that enjoys living life to the fullest, it has understandably taken me a tad longer to finish than the average student….like years longer. I began in 2006 and went for a year, then moved across the country where I found my classes impossible to transfer. When we moved back to Ohio I couldn’t wait to start back where I had left off and started back in 2011. Apparently I have found my niche as a student because I enjoy college so much that I am totally at a loss at the prospect of it being over…so much so that I have invented a reason to stretch those last two classes into another whole year of school. I have decided it is imperative that I become proficient in Español as a move to Colorado looms in the near-ish future. Since I am relying on financial aid, I have to take a minimum of 12 credit hours so that meant I needed to go full time and add a few more classes to the roster. Now that I am going for longer, I am not so worried about my future…strange? Maybe.

LOL, Is this what becoming a “professional student” would be like?

(FYI- The main purpose of writing this post was to remind myself how much I enjoy school as I pull my hair out trying to properly begin the writing of a major thesis paper. Shoot me. Now.)

Thrifty Goodness #1- Pyrex Love

Standard

With my new blog comes a new series…well, I am getting ahead of myself here.

“Hello, my name is Beth and I am an addict. I am addicted to thrift store shopping.”

“Hi, Beth!” The problem is, I usually have nobody to share my amazing thrifty finds with….well, at least nobody who wants to hear about it. I am lucky to even get away with it. I see and follow quite a few blogs that do something similar and it seems like a great oulet to enjoy bragging about sharing my finds with other fellow thrifters. Thus, the Thrifty Goodness series was born. Here is your first installment.

I thrift shop in a lot of different places. Some are online like craigslist or local facebook selling and auction sites and of course most of them are in person. I love the face to face ones like garage sales and flea markets but time doesn’t always allow.

This fabulous find comes from a friend named Jeanne via a local facebook site. I love vintage Pyrex in all its retro colored goodness and have up until now only collected one particular pattern, the turquoise snowflake pattern. I have one large-ish mixing bowl that is a promotional piece that was done in the same turquoise with a swirl pattern.

I have always coveted a full four piece set of cute Pyrex Cinderella mixing bowls, though really wasnt interested in a pattern that was common or unflattering colors to accompany the beautiful ones I already owned. Then one day I stumbled upon Jeanne selling a full set of the pink gooseberry design…I was excited but didn’t want to set myself up for disappointment in case they were not in great shape.

Well, they were beautiful and she was so eager to clear out her storage area that she gave me an amazing deal. I scored the entire set of mixing bowls along with a small, off pattern but very pretty white bowl with green daisies around the top. Also thrown into this amazing bundle was another small bowl in  a wheat color with daisies and a matching small casserole dish with lid.

And just how much did I pay for all of this, you ask? A mere $20 bill.

Amazing find…Image

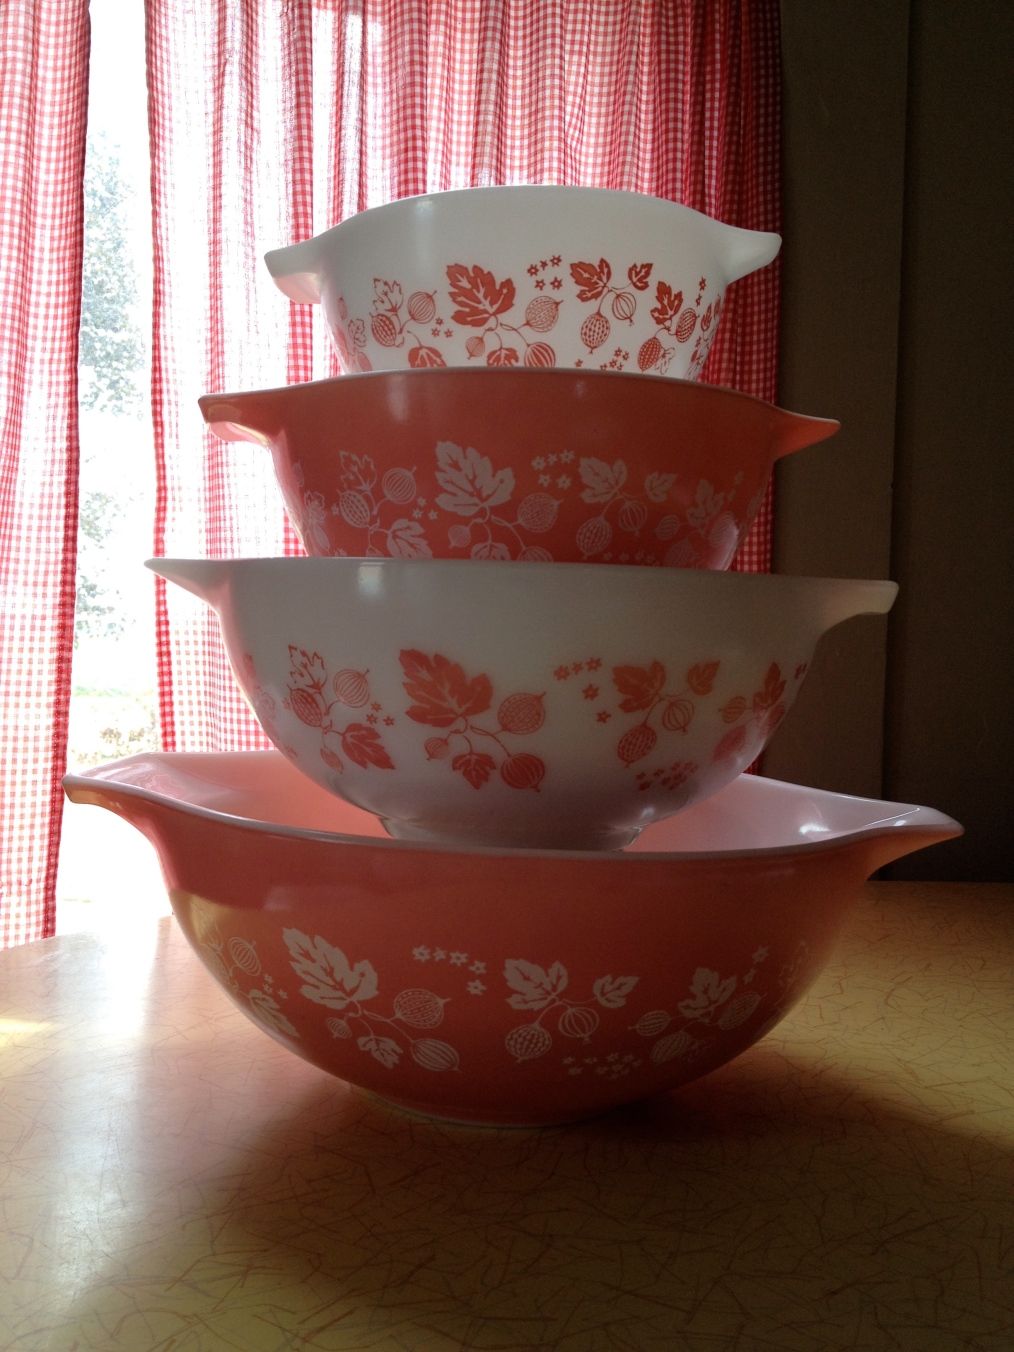
I think this was the perfect first post for my new series. Hope you enjoyed it and the ones in the future!

Rain, Rain, Go A-Way

Standard

…come again some other day!

It is raining cats and dogs so you know what that means, trying to figure out how to entertain two toddlers who just want to go outside and play.

So, what to do? We could-

  • Break out the board games (although Stella is only 2, so that makes it rough)
  • Make a blanket fort, then play underneath it
  • Pop popcorn and watch Disney movies
  • Organize the kids’ bedrooms and toys
  • Get out the aprons and make some yummy treats
  • Bust out the play-doh and crayons
  • Clean House (OK, let’s not get ahead of ourselves)

I am sure they would rather be doing anything else than hanging out inside but the budget has been used up this week so we aren’t going anywhere today.

Good luck to all of you entertaining your little ones inside as well!

We Moved!!!

Standard

When I began blogging last year, I began by adding mostly craft and DIY posts. Well, now I want to expand my blog into other areas so I decided the best route to take would be to start a new blog with a new objective.

Enter: Mama Bee’s Buzzings

  • Why the new name you may ask? I didnt want this blog to focus just on ways to save money like the last one. I want this particular blog to be anything I want it to be, whether I want to write about my kids, or something fun we did that day. Or if I want to tackle a project or brag about my thrifty hauls, now I have one place to record it all.

Who is Mama Bee?

  • Why, just little old me. My name is Beth so I played around with the half-hippie idea and came up with the Mama Bee character.

Please keep coming back to see what kind of things I come up with!

Mercury Glass DIY

Standard
There have been a lot of mercury glass
items in all of the major designer retailers
like Pottery Barn and Ballard Designs.
 
There was one such item in a Ballard Design mag
I was perusing that I coveted…but not at their price tag.
Photo courtesy of Ballard Designs
Price tag- $29-$39 each
I have seen tutorials all over blogland,
but with so many I had no idea which one to choose.
So I read about thirty to get a general consensus,
which was to spray light layers of water and spray paint
on the INSIDE of said item, then blot parts off
and repeating until you achieve the desired effect…
and they all agree to use only one product and one product only,
Krylon Looking Glass Spray Paint.
 
Here is what I started with, a .50 glass garage sale vase.
 
And here is what I ended up with…
 
Love it, but who doesn’t love a good before and after?


Halloween Apothecary Jars

Standard
I started my Halloween decor.
Most of it is silly because I have small children,
and don’t want to scare them.

Here is one that scared one and grossed the other two out…

LOVE IT!


There are my leftover gourds and pumpkins…

and yes, those are

FINGERS!!!!

I couldn’t resist.
I bought them for $1 at the dollar tree,
and used an apothecary jar I already had.
The black netting is the bag the fingers came in,
cut to shreds and laid in the bottom as filler.

For our Halloween party, 
I plan on adding more jars and making a
“mad scientist” lab area.
The jars will be filled with things like:
gummy teeth, chocolate eyeballs
and more.

These three jars cost me about $2 to fill.
See? You can decorate and have fun for cheap.
Stay tuned for more…


Getting the Halloween Itch…

Standard
I have already been thinking about
HALLOWEEN
for a few weeks now.

Last year, I bought up as many cute costumes
as I could find for my little ones 
while they were 90% off at K-Mart, 
so I know I have plenty, I just havent gotten them out yet.

In the meantime, I thought I’d play
with my photo editing software
and post pictures of last year’s costumes.

ENJOY!
Wait, what is a picture of
Judy Garland doing in here…
Just joking, that’s me as Dorothy.


Ethan went as Dracula~


Owen went as Yoda~
The perfect size, he was.


Happy, he was not.


Baby Estella was a pretty little ladybug~


Snug as a ladybug in a rug!


Super Scary Ethan~

Can’t wait for this year!
I LOVE HALLOWEEN!


Fall Harvest Wreath

Standard

This will probably be my last fall decor post.
(until it’s time for Halloween decor)
Unless I come up with another frugal idea…
This one cost me about $8.
I KNOW…
Big Spender!

  • Here’s the rundown of my materials:
  • rattan style cheapo wreath from Dollar Tree- $1
    • spray painted with Krylon glittery brown spray paint left over from this project– had on hand
  • fall silk leaves from Dollar Tree- $1
  • larger plastic pumpkin from Dollar Tree- $1
  • set of orange pumpkins and gourds from the dollar tree that I ended up not liking the color of with the other pumpkins and spray painted- $1
    • Rustoleum Antique White- on hand
  • 2 sets of cat tail and leaf sprigs for fifty cents each- $1
  • Nicer and larger set of mini pumpkins at Walmart-$2.88.
  • pinecones- free from my yard
  • glue sticks and glue gun- on hand

(perhaps this is not the last fall decor post…I have more pumpkins)

Here are some during the process pictures-


Here is the 
wreath being
painted.


Here is the 
ugly pumpkin
and gourd
set being
painted.


After everything was nice and dry,
I warmed up my trusty glue gun
and arranged and glued until I liked the way it looked.


Do you like the way it looks?
(Look past that smidgen of pantry…
that IS organized!)


How about a close up of the goods?


Just one more-
in its new official home.
(Until it gets close to Christmas!)